Changing Colours

The last little while I’ve been playing around a lot with some more of the beauty/makeover tools that are built in with my new editing software. In the old program, they seemed to work a bit simpler, and there’s new aspects that I think I can now say I’ve got a grip on! I’ve decided to show snippets of my work and learning on just specifically this tool, and then create one ‘total makeover’ video tutorial of my own! I find it helpful since I’ve  been learning from Corel Discovery and Christopher Oneil  through their Youtube channels!

Last post, I nailed down correcting blemishes and skin softness, but I’ve discovered a new tool to creating colour differences as well.The ‘skin tanning’ tool is something that I’ve never used in the old program, so I though I would give it a try. . To start, I had to learn how to use it. Different than the blemish tool, the tanner changes the colour of the selected area to the intensity level of your choice. Here was my progress…

I again, used photos I’ve taken of my sister to practice on the new program, before I move to actually using it on clients. This photo below is the original.

*Note the colour of her face. IMG_8892

Process of colour changing below. Notice the difference in the process. I played around with different strengths and brush sizes. Here I only used 50% strength since I didn’t want it to be too intense. TAN HALF

The final product. One thing I did notice though, is the attention to other skin in the photo. I also had to work on her arms, but rather than using the largest brush size, I decreased. TAN

I’m still not sure on how I feel about the tanning tool, and it really depends on skin colour and the background surrounding the person in the image. I tried a few other photos to try get a feel for different skin tones before applying the tool. I found a HUGE difference in editing fall photos (since the background in the fall is mostly oranges and yellows, the person in the photo takes on that colour as well). See what I mean…

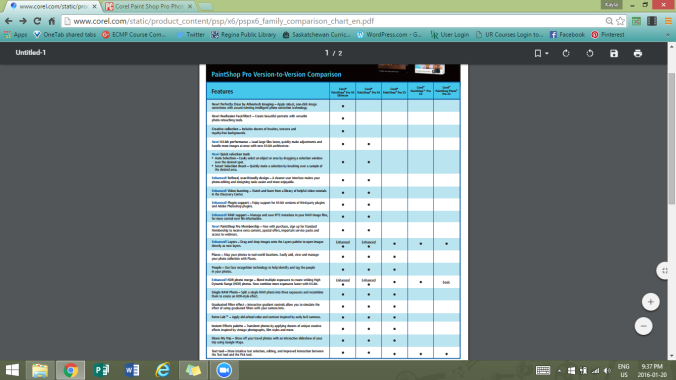
Because of the background setting and the setting I had my camera on (that I found using the manage section of the program, WOO! Learning!) Her face already took on a different colour than it really is. It’s crazy that the second photo was only one touch @ 50%! 


I’m really starting to find things move a lot quicker in using this program! I often revert back to the old one which I find to be so slow in terms of processing speed, but I still have been using it on my clients until I get a full grip on how X6 works! I have one more tool to master (teeth whitening) that I have used a bit with the old program, but I am finding HUGE differences in the new one!

Watch out for the next post on teeth & following that a full video tutorial on the makeover tools available on Corel Paint Shop Pro X6!

Building a Virtual Learning World

Recently, I have been babysitting for a family where the parent’s really limit the use of technology during the day. We play outside, do crafts and learning activities- it’s great! But, when the youngest boy get’s a chance to use his iPad, he INSTANTLY goes to minecraft!

It got me thinking, how can I make this educational too? It’s something that he LOVES to do, and I have all the parent support for learning in the world- So I did some research!

I came across this tweet from @EdTech_K12 sharing the new reality of minecraft in the classroom! MinecraftEdu is a new tool that is being launched designed to be used in the classroom in many different areas of learning, with the base around students learning to ‘code’.

My question is though, what other areas of the curriculum can we link this to? I did some research and found this AMAZING video by @johnmillerEDU . In this video, he talks about the many possibilities that Minecraft can be used in the classroom with teachers who know very little, to teachers who are experienced! What is cool though, is that teachers can learn to set up ‘worlds’ with goals for the students to progress to. Basically, teachers can create simple tasks that can link straight to the curriculum, AND you can link with other classrooms!

John Miller also talks about the ability for students to use journals for writing within the worlds that get virtually handed in to the teacher to assess. (7:30 in the video!).

This tool is so broad and can be used in so many different areas in the curriculum. John talks about using the journals to write and assess, to the use of fractions in math and directions in social studies. Students are taken to different worlds and quests that must be done and the teacher can follow along with the student’s progress. The MinecraftEdu version is specifically created for teachers and comes with pre-set up lessons for teachers to use that link directly to the curriculum! The screenshot below is an example of a simple quest set up for students to complete…

Screenshot (44).png

There are so many possibilities with this tool and I think it would be so simple for students to use, since they already have so much knowledge about it. Making learning not seem like learning? Awesome!

I really encourage you to check out John’s twitter and video, there is so much info to be learned & he sure knows his stuff!


If you’re reading this any have any additional resources or info, I would love a chance to try this out in the classroom, or with my little guy as I babysit!

The Stats are Too Real

I’ve heard and read a lot about it, we’ve talked about it in class discussions, but will it soon be our reality?

I love teaching. I love what I have chosen to do, and I absolutely am excited to jump into my career in the next months to come. But, with so much talk about teacher burnout, the scary reality of not all of us continuing on our path as educators is real, and it is a possibility.

I would never, ever, want to do anything else and I knew fair and square when I chose this path that it is not always easy, I’m in it for the outcome, not for the income. For some people, it doesn’t always turn out to be that way, and there is so much talk about teacher burn out, it often can be a scary thought put into our minds as new educators. Just google the stats, it’s scary!

So, why am I talking about this? Because being aware of the reality that we will face is a step in the right (and most positive) direction. Recently, I came across this article on Twitter, shared by my fave, Edutopia! It talks about the reality of this profession, but what I LOVED, is it talked about what we can do to avoid it- to make sure that this doesn’t become our reality.

Some of these points are so simple, but so easily overlooked and often had me thinking back to my internship experience and my time over this break.

1) Maintain Your “Other” Life

For some strange reason, teachers are seen to be teachers, and that is all. It shouldn’t be this way, and we shouldn’t feel this way. When I walk into a classroom, or pick up my camera, I do it because I want to, because it is my passion. When you do something so much, so often, sometimes it becomes more of a job than a passion, and that’s where things go south. In internship, school, and future jobs, I know that I need to remember that life is about balance and finding it is part of becoming a great teacher and a happier human.

2) Be a Stakeholder When Changes Are Made

I hated change. (key word, hated) From the day I got the call about interning in a grade classroom that was totally out of my comfort zone, changing everything I knew, made me panic! But, one of the biggest hings I learned in internship is that change isn’t a horrible thing- it’s actually so good! Thinking back now, I wanted one thing. I wanted younger children, the same activities that I knew and was comfortable with, and that is what I wanted to do. Any thought outside of that made me resist, scared and grumpy. WHY!? I stuck to the same things as I knew, so what was I learning? I am still thankful for whatever reason it was that I ended up in grade 6, and I know that it was one of the best things that could have happened to me in my career. Because of that experience, i changed. I had no choice but to role with the changes, do things I’ve never done (I even became a volleyball coach? what!?) I was scared, anxious and now I am SO happy. I love change, I love new things, and I love all the possibilities that this career can take us- if we let it!
So don’t be scared, change is going to happen, so let it! How boring would it be if we didn’t?

5) Keep It Light

Lastly, if you know me, you know I am a positive, happy, bubbly person, both in the classroom and out! Reading this section of the article made me realize just how important that really is! Things are going to happen, won’t go our way, and there will be bad days…but if we always remember the good in this career, the reason why we chose it, and the fact that it is a bad day, not a bad life, things start to look a little differently.

So in the end, go and be a teacher, do your thing, and rock it. But never forget the reason you chose to be where you are, and just how hard you worked to get there. It’s like we are climbing a mountain, you’re at the bottom now, but you’re further than you were yesterday, and you have so much time to go up! Don’t burn out, remember these things on your bad days, share them on your good days, and find a support system that’ll help you though.

Digital Impressions-Do you know me, before I know you?

DigitalIdentity_Feature.jpg

Just as said in my title, it is scary and hard to believe that this is the reality of the working-class world. Will my employer know me, before I even step foot into the interview?

Well, maybe, and maybe not and it all depends on just how one would like to represent themselves on the internet..your digital identity!

I never really was concerned about my ‘digital identity’ in the past years, but was never someone who would post things that were ‘bad’ necessarily. Although Timehop reminds me every now and again some un-needed Facebook status’ I made when i was 14 [haha], I never thought about how important the things I posted online were to the future of my career and what people think of me as a person. During one of the summer’s I worked as a camp leader, my boss and I had a discussion about if she ‘creeped’ me on Facebook before she hired me. Her answer? ‘Heck Yes I did!’

Did this make me uncomfortable? A lot. But it was the time where I started to realize the impact that my online identity would have on future jobs, and potential opportunities. From that point on, I knew it was now a reality that what people saw about me online was going to make an impression to them that I couldn’t always take back & so I needed to make sure anything that showed up when googling my name was nothing but great. Because to be honest, how many other Kayla Onufreychuk’s do you know?

Just me, all alone. I am the one who is responsible for my own digital identity and I need to make sure that I do a good job in maintaining it. A post that was shared by Taryn talked about the extent to which employers will go to, to try and find out who you are before they decide to interview or even hire you. The post discussed how sometimes it is as easy as a ‘make or break’ situation to decide if you are a worthy candidate for the job. Yikes.

Now, don’t get me wrong, I agree that it isn’t necessary to be posting appropriate things online, or updating the world about what you had for supper, but it does scare me that this is a reality, and not a lot of people know it. People like our students…

When reading this article from a tweet I found, it really hit home to me that students may not always see the impact of the things they choose to share online. As talked about in the article…

“In its core it can be seen as the combination of key and entry codes, that opens doors in the digital world. Its security and uniqueness should at all times allow the network to validate and provide access to a “room” for a specific digital entity.”

It is one thing to focus on being sure my own online identity is safe, but equally important to make sure that students know the impacts their digital identity will have as well. If my job as a teacher is to be a role model for kids even at young ages, I think it is important to model the behavior that needs to be put online and shared with, potentially the world. Ironically enough, I found out that yesterday was #SaferInternetDay and I searched for some tips for students, teachers and parents to use when discussing digital identity. Here’s a great resource!

So in the end, read the tips, be aware and understand that this is the new world that we are in where it really can be a reality for someone to know us before we even know them. It is scary, but being educated and educating the young ones around this makes me feel a bit better about the whole situation. It doesn’t have to be a bad thing, if we don’t make it to be that way!


PS: To really get to know just how this all fit together, check out what Brett and I did to try understand this whole concept. I found a bunch about her & I know she did the same! Check out the doc below. Can we be Facebook Friends again please? Haha!

Digital Sleuthing- Brett Loeppky

Makeover Tool: A Simple Start

Change is something that always takes some time to get used to, and in my case, changing over to learning a whole new program is definitely a been a learning curve. As I’ve played around with the new program in comparison to what basics I’ve known about the old one, I can really say that digging into this program has been beneficial! I’m learning things that I didn’t know existed, and learning how to make the best use out of software I payed for!

Now that I have gotten used to moving around the program and have the basics down, I started to move onto some basic editing. I knew that the makeover tool was something that would be an easy starting point and will be so beneficial to use on future photos so I gave it a try. I needed some help since there’s some new features to this tool that i wasn’t aware of and learned from this video…

Christopher has some great video tutorials on all things photoshop and he’s been really helpful! I look forward to trying some of his techniques and making my own video tutorial in the near future!

It takes a while to get used to the hang of things, but here’s what I’ve done so far…

In this photo that I had recently taken of my gorgeous sister at grad, I had done some minor retouching, but all with the old program. This one was pretty basic but I can see a huge difference in the new tools I played around with in X6.

Before                                                          After

This second photo is a ‘selfie’ my sister had taken and she edited using a cellphone filter. I did some retouching with the blemish tool and smoothing tool as talked about in the video to create this!

Before                                                          After

It takes a bit of getting used to as the tool pulls colours from the surrounding spot to fix the focus point on the image. I found in order to get a smooth texture especially on a face, it is best to move at a medium strength and a smaller brush. The skin smoothing tool is something that I also found a bit to get used to and is something that takes a long time to process. I’ve never used this tool and I quite liked how it turned out!

I look forward to playing around with more images and pulling some photos from my external harddrive that i’ve taken in the past to ‘fix up’. Keep an eye out for a tutorial in the next little while on how I did this and how I’m learning to use the whiten, tan and thinner tools!

Creating Genius’ Through Genius Hour

0959f028281165bfd0bf2bbe4af112d9

So recently I have been doing a lot of exploring through the hashtag #EdTech on Twitter and have found some pretty interesting things. I really loved the list of edchats that teachers can participate in on Twitter that Curtis shared, along with tons of informative new apps to try in the classroom. One thing that has popped up a few times was blogs and posts linked to the hashtag #GeniusHour. Being such a catchy phrase, I clicked on a few and began to do some exploring!

One of the first posts that caught my eye and probably my favorite so far was posted by E School Newsa blog that I had recently added to my Feedly list. This article breaks down what this ‘genius hour’ really is and why we should be using it in our classrooms. So, looking into it, I have found that the basics of using genius hour is for students to find what they are passionate about, and LEARN! As quoted in the article, “Once they discover what they’re truly passionate about, the learning and engagement will never stop” – A great reason to try this out right??

The post goes on to talk about ways to start genius hour in our classrooms and some helpful places to get started. Linked right in the post was a site called http://www.thrively.com/ that is a great tool for students to use as a starting point for their projects. I actually took the time to sign up for an account as a teacher and am in the process of exploring it right now. It seems to be really simple for students to use and has a progress tracking system that allows teachers to see how students are doing on their projects and provides ways of sharing and presenting. I’m super excited to look more into this and explore what other ways of going about this would be.

Lastly, within this article, there was a GREAT resource provided for free that can be used as a great starter for making your own ‘genius hour’ in the classroom. It’s super simple, kid friendly and is sure to get the creative juices flowing in your students minds’. Check it out!

Overall, I found this article to be the most informative in the shortest and most simple way! It is a great read and can be found here! Along with this post and many others, I followed the Genius Hour hashtag on Twitter and found that a lot of teachers and student’s share their own Genius Hour projects. This is a great way to show students what they are capable and to get them excited to start on their own. This tool is something so simple that takes an inquiry approach and adds a spin onto it to make it fun and inviting to students. It’s something that I can definitely see myself using in a future classroom and I’m glad I was able to look into ways of getting started.

I’m Inspired..

Today was a powerful day for all people facing mental illness and mental health issues. This topic is something that recently became of interest to me for a variety of reasons – Two of my very close family members are dealing with things I can never imagine going through; things that are hard for me to understand and even hard for them to understand.

What scares me (and I can’t imagine how they feel) is living in a world where these kinds of issues are not always taken as serious as they should. For instance…

b02de76c584868e4fb76f4c55b463676

But today- #BellLetsTalk day opened my eyes to SO many things. At the most, it made me realize that if we surround ourselves with people that lift each other up instead of tear each other down, we can get through this together. Seeing and participating in my first ever twitter chat with the @STARS_Regina group made me see just how many people really are on board with standing up for mental illness and ending the stigma. The duration of the chat may have been short, but the comments and eye-opening comments that were made by future educators and soon to be role models really showed me the impact that we can make together.  Comments like these bring SO much hope for people who suffer in silence, and who deal with these issues every single day…

This slideshow requires JavaScript.

My hope, along with a lot of others, is that we don’t just remember mental illness today and move on to another day forgetting. People who suffer, deal with this every single day, and we need to make sure that we can educate ourselves not only today, but everyday. I’m still learning, and hey- I always will be, but what’s important is that I do my best to understand the unfathomable and stand alongside of my family members, my students and my future co-workers.

Let’s make sure nobody is left in the dark – I’m sure not leaving anyone behind.

#BellLetsTalk

Vlogging My Thoughts on Feedly

I made a VLOG? Wow, I’m really liking this technology thing!

I’ve watched a lot of vlogs but never really for any educational purposes. Now that I know how to manage the Screencastify App I thought I would give it a try!

Check out my thoughts on Feedly, my favorite sites and how I hope it all works out!

What does this button do? – trying things & setting goals [PART2]

As to be expected sometimes, technology doesn’t always go the way we want it to, but I really wanted to get some of my learning out there and shared via my last post! In addition to that, I wanted to show a little bit of what I’ve been doing in my learning project and show you what I’ve learned so far!

In my last post I talked about where I found my information and how I’m in the ‘getting started’ basics intro to the program. After videos and tutorials walking me through the program basics, I found out some of the first steps to using this program and learned a lot about what I still have to achieve!

This is my very first Screencastify that I have merged with a voice over (due to limited audio equipment on my “editing laptop”) to create this video! It’s a little choppy, but then again, so is my learning at this point…which means I have a TON of room for improvement! J

Check it out!

What does this button do? – trying things & setting goals.

So, as I dive right into this learning project I find myself comparing some of what I do know from past editing programs to my new one. I hoped that a lot of the appearance stuff would be the same but that would just be too easy! So, I started from scratch.

What I’ve been doing was first doing some research on how exactly what I should be starting with and where it is that I should be learning it from. To start, I began with comparing the program I had with the new one… looks like there is a LOT of upgrades…

Screenshot (36)

I found a ton of information here about both programs and decided where my starting point will be based on the information gaps between each program.

Which means I have A LOT to learn! (yah!)

I have been lucky and found some of Corel’s best videos and instructions (this one in particular) as well as some other simple sites that give me step by step instructions of what I want to do. I decide to first start with the BASICS and figure out the platform that I will be working from.

I’m just completing my first Screencastify Video for this project on all of the BASICS of this program and navigating my way around it before I dive right into the editing! Stay tuned as technical difficulties are creating a bit of a roadblock!