A Scary World

internet-safety

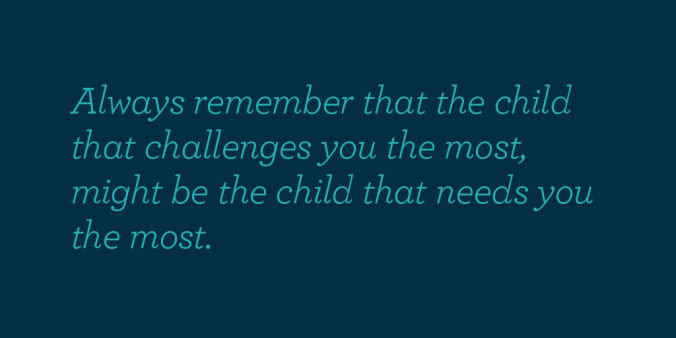
Recently in school and life I’ve been surrounded by a ton of talk about the sexualization of women and girls, and the affects that society, media, and the internet is having on them. It is something that I’ve talked about in my Women & Gender Studies class, PD events such as the Unslut Project, and even right in ECMP355 through digital identity. I know that it’s something that isn’t necessarily new to me, but something that is becoming more and more popular to talk about, and even more important to recognize.

Recently from watching ‘The Sextortion of Amanda Todd’  as well as ‘Sext Up Kids’ in the past, I’ve really been thinking about how scary it is to be a child in the world of the internet. To a child, it may not even seem scary, but as a teacher and someone who will have her own children someday, it really is scary to think about the possibilities a child could end up with on the internet, and the situations they could get themselves into.

I feel like I’ve been overloaded with information, stats & films about all of it, and I need to get my thoughts straight.

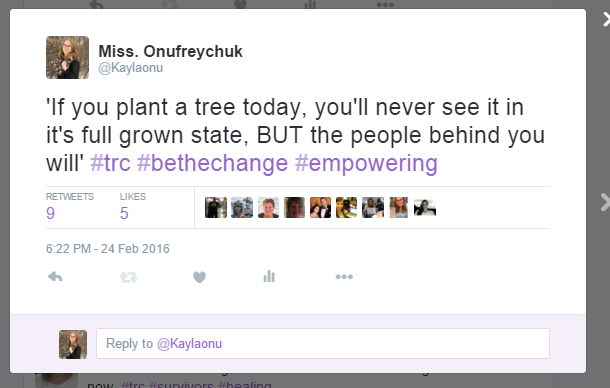
One of the first things that comes to my mind when thinking of all of this is the importance of educating our students on  everything surrounding digital identity and internet safety. I think that even from a young age (sometimes a scarily young age if we’re allowing tech.) we need to be emphasizing the dangers of the internet and how quickly things can turn bad. I’ve seen a ton of posts that show teachers or parents that try to prove just how fast things can spread on the internet, and even in this post, how it can backfire too!

Education: Tennessee teacher Julie Anne Culp posted this note on her Facebook page on November 18 to teach her students about internet safety. It has received more than 392,000 likes and been shared more than 30,400 times

Education: Tennessee teacher Julie Anne Culp posted this note on her Facebook page on November 18 to teach her students about internet safety. It has received more than 392,000 likes and been shared more than 30,400 times

By doing, or even showing students things like this, it really gives them a perspective of how the internet works. In addition, we shouldn’t just do thing like this once, but always be emphasizing the importance of internet safety. Rebecca does a great job of talking about this in her post and has some great resources on internet safety & digital identity.

Secondly, and one of the biggest worries for me is the idea of children growing up too fast. I’ve seen this a lot in so many ways over the past few months and the push to make it end has been prominent over social media (yah!). A lot of my peers have been discussing this and I found that Ryan did a great job of summarizing his thoughts on the whole idea in his post. He talks about the acronym KAGOY (Kids Are Getting Older Younger) and how that affects children and adults directly. This made me think about a recent post I had seen on Twitter (check out this similar one) about the advertising of shirts with logos/sayings and bathing suits on young girls and just how this sets them up for ‘KAGOY’.

After reading this, I started to reflect on how I felt as a child growing up. Aside from maybe playing with makeup at a younger age, I never really felt myself wanting to ‘grow up’ any faster than I was. I played with Barbies and rode my bike just like all of the other kids...but I rarely had technology. So, where does this change? Is it just the spread of social media and online communities that are making these children ‘grow up too fast?’. After reading Kara’s post about this same idea, I realized that it goes far beyond the screen of a computer. Things such as Barbies, TV commercials, and even the Emoji’s that they use on their iPads or cellphones are shaping them into a world that makes them want to grow up more quickly. Kara’s post really opens up your eyes to the wide range of ways that this takes place, go check it out!

In the end, watching the film about Amanda Todd had me feel the heartbreak of her, and all the other cases of this that is happening way too commonly. The fact that this is happening so often and is becoming such a reality is so scary, but what is even more scary is the stats of actually finding justice behind all of this. In the Todd film, they talked a lot about the lack of police support and the pressure put on the victim to ‘defend themselves’. Hearing this from a victim’s parents was so scary as even they couldn’t do a lot to help their daughter.

We know that we now live in a world where it is a reality for our children to be online at a young age, and that it isn’t realistic to ask them not to be. We need to be aware of these dangers, and so do our students and children. It’s not something that needs to be kept in the dark anymore, and it’s not that complicated to understand. The internet isn’t going away, and our kids aren’t going to stop using Facebook or social media. So this means that it really is our job to make sure that they are safe.

Making You Disappear [Pt.2]

If you checked out my previous post, you’ll know that I’ve been doing some pretty cool things with my #LearningProject and my editing program!

Well, I’ve been working further on it, and I wanted to look into what else I could do! As I talked about in the last post, the other 2 tools that I could use were very similar, but used for different things. I found the scratch remover tool to be simple and easy if there is well, a scratch that needs to get rid of. But, just as easy is the blemish tool, which I think I’d choose anyway. Then, there was the object remover tool, that I actually found to be the same as the clone tool, but not as easy to navigate.

So, in the end, I’ve found a happy medium of using the clone tool to do the things I need it to do! What I did find though, was that instead of just getting rid of things, I could also replace things! [hence, ‘clone’].

If you’d like to see how that works, check out my previous post! If not, check out what else this nifty little tool can do….

In my last post, I got rid of little things. This time, I had a specific request awhile back to get rid of a person. This time, I know how! It takes a lot of time, and I needed to be really zoomed in, but how cool!

IMG_2218IMG_2218BOYSEDITED

I started thinking about what else I could do with this tool. So, instead of getting rid of something, I thought I would do what the tool entails and clone! This photo was my first ever lightening shot this past summer! It blew up on Facebook, but I thought I would try see what else I could do!

My First Lightening Shot ED

My First Lightening Shot ED cloned

You can see here that I added more lightening bolts and a few more power posts too. It’s tricky when working around different colours. I had to be careful at the size of my clone brush.

In the future, it would be interesting to see what I could do using lightening from one photo, but using it on a different one. I thought of this and so I tried this idea with another photo.
The idea here was to put two photos side by side, and take one image from photo 1 and clone it into photo 2. I am sure there is easier ways of doing this, but here’s what I did…

moving target

It’s definitely not the cleanest technique, but you see what I can do. Also, I needed to be careful with size. It was tough to match the size of Target [my adorable dog] to the size of Dylan and I. I am currently looking into better ways to blend two photos.

Last one. This one was easy, but it just sums up what the clone tool does. It’s so easy to just grab an image and move it on the same one, especially with a consistent background image.Who doesn’t want 3 of my adorable dog!

triple t

Looks pretty flawless to me, this is about as easy as it gets. Focused clone target, simple colours and a consistent background 

Well, that wraps up this tool! It was definitely a fun one! If there’s something you’d want cloned, send it my way & let me know what you think of these!

Next, while searching for tutorials on this, I found some cool videos on background editing! Stay tuned!

I Can Make You Disappear!

Oooh, catchy title! An even cooler post on what I’ve been doing in my learning project!

We’ve all had photos that aren’t quite what we wanted them to be. Maybe a mosquito landed on your face, or a bird in the background that we wish wasn’t there. Well, here’s how I can help!

This editing program has 3 different tools to help fix those problems…
1. Clone Brush
2. Scratch Remover
3. Object Remover 

This post, I wanted to start simple, so I looked up some videos on how this works. I knew the basics would be similar to the beauty tool and how to get rid of pimples, where I demonstrated in a previous post.

So, I again, went to youtube to see what I can learn. I wanted to mainly know the difference between the 3 tools and what the differences are. I found this video that was super quick, and simple to understand. I played around with it a bit and tried it out myself.

settings.jpg

Up at the top are the settings that make this task possible. Playing around with the size, hardness and step is something that takes some time to get used to. Also, the hardness really affects how your final product will look.

The way this works [aside from the complicated settings] is that you ‘right click’ the area you like and ‘left click’ on the unwanted area.

first steps

In this case, the blue arrow, is the selected area that I ‘right click’ and then I move the mouse over the white words or the red arrow, and it transfers the area.

Check out how it works! I made a video, but THIS TIME, I dropped the audio and put it in speed x4!! Helped out the technical glitches and the lag. Much easier to watch..

  https://www.youtube.com/watch?v=uvgD5n9mxi4

PS: That music… 😉

Within the video, it shows me both changing the size of the brush and the hardness (which means how much of the selected area is going to show up on the new area)

It does take awhile, and the bigger the area selected, the slower it gets because it has to pick up all of the area and transfer it. The end product was pretty good…

A really cool trick to know!

 I wanted to try this a little more. I may have gotten carried away here, but it was worth a try…

This definitely wasn’t as easy. Braces are small and  working with a non-solid colour makes it a LOT harder, as well as being zoomed into my teenaged sister’s teeth….ew. Haha. There’s a reason I’m not a dentist!
As you can see, I gave up on the outside edges of her teeth. I got frustrated at how hard it was and how the colors weren’t blending. I think I will try again on another photo.

In the end, I think I can say that I nailed the basics of this which is something that’s pretty new to me. I was originally going to tackle B&W colours next, but this actually came up in a client wanting some work done. I’ll show you that next! It’s a big job!

Share Positive – Words of Wisdom fr. the Interweb

Since this weekend I was hit with a ton of work on top of family coming to visit AND to top it off, a killer cold…I feel like sharing a warm, positive, smiley post. I am not about to get into anything controversial over here this week, this sickness has been really restricting my thinking abilities…and my ability to get out of bed 😦

Anyways, I’ve been saving this link for awhile now as I found it on Edutopia awhile ago. When we think about the internet and our discussions around #EdTech or #ECMP355 in general, we often focus on our students and ways we can use tech with them, or often totally different controversial [or just deep thinking/reflecting] topics surrounding teachers and technology. What we don’t do a lot of, and one of the things I LOVE about the internet, is sharing positive things/tips on just basic teaching.

So, this week I wanted to write on something light, but meaningful, and this post was just that! I wanted to use the internet to share some positive, uplifting words to think about instead of digging into something deep. We all need a break & a time to just take it slow, so here is mine. Here are 10 Things Every Teacher Needs to Know…

 Be patient with yourself
I think that in every situation, we need to take the time to realize that we are new to this, and that things just take time. Realizing that is important for our sanity, and for the well being of ourselves as teachers. We all want to conquer the world, we can’t do it in one day.

It’s okay to make mistakes…
sigmon-10thingsnewtchrneedsknow-2graham
It’s going to happen. We are all human and we are all new at this. Knowing that it is going to be a reality and taking the responsibility to own up to your mistakes is so key in what we’re about to do. We teach our students to learn from mistakes, but we need to let them know that we make them too! And you bet, we will learn from ours as well.

Get a good supportive pair of shoes
Well, if this doesn’t want to make me go shopping…. But in all reality, sometimes we overlook simple things, a good reminder!

Get connected
sigmon-10thingsnewtchrneedsknow-4gibbons
I found this out in internship, fast! Our school was wonderful & it really showed me the importance of being social and showing that ‘hey, I’m new, and I need some help..’.  A school is full of people who are all different and therefore all bring different things to the table when it comes to resources. Hey, even the janitor is a help [Especially when my windshield wipers were broken! Thanks, Larry!]

Be Yourself…
My fave. Who are you trying to be, if you’re not yourself. How can you go to school everyday and love your students, coworkers and job, if you don’t love who YOU really are. Be you, and 100% you. There isn’t anyone else like it. 

There will never be a perfect lesson plan…
sigmon-10thingsnewtchrneedsknow-6peacock

Nope! And there will be ones that go straight into the garbage… But, that doesn’t mean you’re no good, and that doesn’t mean you’re a bad teacher. It means you’re still LEARNING. just like you’re students. There is no point in hiding that, because why hide what is going to help everyone. I like to be open with my students. This even happened to me in internship at a point where i was pretty happy that I had never had a ‘failed’ lesson. But, it happened, the smartboard was glitching, the phone was ringing, the speakers didn’t work, my students were confused and NOTHING worked. I stood there, looked at them [after running around trying to deal with it all] and said, ‘let’s not do this’. They looked SO shocked, and we started to laugh together. I explained that it wasn’t going the way we wanted, and that if our brains aren’t in the right place, we won’t be in the right place to learn and move on. So, we did a brain break, moved onto another subject, I revised and we continued the next day. What is wrong with that? The kids were so supportive of my truth, and they reassured me [so cute] that it wasn’t a big deal. Why? Because it really isn’t! 🙂

Take one day at a time
…And one YEAR at a time. We are going to be new, and might not be in the most ideal place or position we dreamed of…YET. But, we need to remember that day by day, step by step, we are climbing that mountain and getting to our dreams. Everyday won’t always be a dream, but eventually we will get to a place that we LOVE and know that it has all paid off. Hey, we have a few weeks of school left, even now we are taking it day by day…just like we did in our first year.

Always remember that child that challenges you the most, may be the one that needs you the most…
sigmon-10thingsnewtchrneedsknow-8robles
This is a big one. We will have, and have had those frustrating days and think WHY is this happening. Often, we look past it and only see the child for the situation that is occurring, not often the deeper level.  This is happening to me right now as I nanny. and I HAVE to look past it and see what is going on. These kids NEED us, for everything that we have. Sometimes, they just can’t show or tell us in the right way..so we need to remember it. 

Keep a Journal
Hey, kind of like this blog right? Where else is there a better place to share, reflect & grow as a professional. I can look back to what I did last summer, and how my teaching philosophy changed from four years ago. You worked hard on this blog, don’t let it die. 

Know they’re fabulousness
Don’t forget it! All students, no matter the day you/they are having are they’re own kind of awesome. Sometimes we won’t always see it, but don’t forget it. And, don’t let them forget it. We chose this because we KNOW they are awesome, and we want to embrace they’re fabulousness.


I loved this post, as simple and cute as it is! Sometimes we need to just share these thing with each other, share a funny cat video, or a kid meme. Our job’s aren’t easy, but we need to learn to laugh, and just be light sometimes.
Feel free to share it too!

Social Activism & Women

likeagirl

It really does seem like they’re everywhere. Social activism campaigns and social media campaigns seem to pop up everyday without us even realizing that they are. These things have become so frequent that sometimes we don’t stop to take a look at what is actually going on!

Looking back, or even just scrolling through my Facebook page, it really struck me as to how many social media campaigns there are just in my everyday feed. What is weird though, is that they don’t seem like they’re any type of strategic plan, they just work! Things such as the past posts like Kony2012 or the ice bucket challenge stand out to me, but only because they blew up. These other ones that are in my everyday media sites however, differ in the extreme aspect, but still are making impacts everywhere.

One of the things that really has been standing out to me is the social media spread and activism push for women and girls equality. Especially important, with today being International Women’s Day I’ve seen a ton of social media spread about standing up for women and the power we have behind doing so. To think off the top of my head, some of the recent ones such as #BringBackOurGirls and Always/Dove’s #LikeAGirl campaign are campaigns that I see daily. What makes them appealing to me? Well, I am a girl too!

But, just because I am female and am subjected to these campaigns, does not mean that I am necessarily doing anything with them. I’ve read a lot from my peers on this topic and what I do find interesting is the idea of ‘slacktivism’ that Ryan and Sarah both talk about. Reading their posts and thinking about how much we really do participate in these things further than just re-tweeting or sharing a post once or twice. Furthermore, it got me thinking about these women-specific social activism campaigns and what we as women actually do.

unslut.JPG

As much as I feel like I’m all over the place with this post, what I really am trying to get at is the importance of having an impact. Today in my Women & Gender Studies class, we had the privilege of having Emily Lindin, the creator of the Unslut Project come in to talk about her own social activism campaign that she actually created, all because of her experiences being a female.  As much as I’d LOVE to get into how awesome this lady is and her success with this campaign, you can check it out here yourself too!

The point behind this campaign though, is to share your experiences with the world and stand up behind slut shaming [something she focus’ on a lot]. What I found makes her campaign work though, is the fact that it is so relatable to girls and women around the world. With that, moving further than just a hashtag, she has created a book and a documentary to share her own experiences with the world.

Her goal? To get other to share too – so that what happened to her, doesn’t have to be the norm.

How do we do that? Get involved in more than just a hashtag. Stand up for everyday ‘slut shaming’ activities, be a mentor, talk about it in your circle of friends, share your stories, educate yourself.

After today listening to her give us great tips on what we can do in her own social media campaign, as well as looking at what Dove/Always does to target young girls/women, it doesn’t seem so overwhelming at all. What really speaks true to me though is that these are all things that go so much further than using a hashtag one time. 

So, whether it is just sharing a hashtag to have a push for better ‘girl emojis’ or sharing your story and having conversations with people in our circles, we need to find things that appeal to them, and roll with them. These campaigns aren’t put up for any old reason, and they are aimed because people need our help. In the case of women in society, these campaigns may be the initial push that causes equality and change in our future. How will we ever know if we don’t try. So, don’t be a slactivist, but definitely DON’T feel like every campaign is for you. We can choose to do 100 things good, or a few things GREAT!

Makeover Mania

So as I promised, I created a video that was all about the makeover tool!

Pros:
I really did love the idea of making a video to demonstrate my learning in real-time. This way, you don’t just see the end product, but the actual steps in getting there. Also, it is helpful to anyone else who is interested as they can follow my steps, just as I’ve followed other’s videos in my own learning.

Cons:
Something I didn’t realize at first, is how limited I would be in time! Screencastify limits 10 mins max! Also, using my ‘editing’ computer, really limits the processing speed when multiple applications are open at once. This is especially true when using screencastify to record my process. Everything is extremely slowed down, which makes it frustrating for viewers to watch.

Something that I think I may try in the next video, is skipping the voice, and recording in real time, with an edit of fast forwarding. This way, viewers can ignore the lag in the video, and watch step by step, minus my voice.

Let me know what you think of this, and if you have any suggestions! 

Be the Change

Last week, I had the opportunity to be able to listen to the Honourable Justice Murray Sinclair as he talked to the UofR about Truth and Reconciliation. When we were asked to tune into this presentation, I really had no idea what I was about to engage in, and I really did feel horrible about it.

I felt uneducated, unaware, and embarrassed that I really didn’t have a firm grasp on the concept that was about to be discussed, but yet it is talked about a lot.

He began to speak about things that have happened in the past, residential schools, segregation, assimilation. I knew all about this, but I still felt like I was missing something. But, as he talked, he said this..

“Don’t feel ashamed because others may know more than you. What matters is that you are here”

At that point, I realized that it really doesn’t matter what background we have, who we are, or where we are from, reconciliation is about moving forward in peace. One of the things I found interested was the way he talked about doing this. As my classmate Larissa talks about in her post, the importance of letting go of the anger, but never forgetting the past is something that really resonated with me, and is something that is so crucial to teach students in the classroom.

As he went on, I really felt I had a better insight into what we were talking about, and I really didn’t feel so blind after all. What I think was important, and what the whole purpose of this presentation was, is to have a conversation surrounding the truth and reconciliation, and the steps we need to take in moving to a better world. The post important part about this though, is exactly what Larissa said in her post…

TRC Tweet


This is not a First Nations people’s issue, this is a Canadian People’s issue

Now, all of this talk the whole night had me thinking about what it is that I can start to do next, as a teacher and as a Canadian. One thing that Justice Murray Sinclair told us all to do, and told us with some humor too, is to read the TRC, and educate ourselves. For me, this was so interesting as I started to dig into some of the key points that in reality,  I had no idea about. In addition, I took the time to read Leanne’s post on this topic and her thoughts on the TRC and choosing call to action picks.

In the end, I felt that just as Sinclair said, we need to educate ourselves and move forward and he said so in a way that was so powerful to me in this tweet…

Tree Tweet TRC

He ended this presentation in perfect way, and with this quote, it really hit home to me (and all of the others that retweeted it, yah!) One of the reasons I liked this quote so much, and other’s agreed, is because it doesn’t point to anyone in particular (whether you are aboriginal or not).

It speaks to everyone in the sense that this is the way we should all see life, learning and education. 

‘Eye’ am Getting Good at This

If you’re reading this, you probably clicked on it because of the awesome title! If that isn’t click bait, I don’t know what is! 😉

Anyways, this post is all about my learning on PSPx6 and EYES!

This area has something that has always been of interest to me, so I’ve spend that last week or so learning about things that this program allows me to do in terms of editing eyes!

What I DO know…
In the past, the most that I’ve ever done with eye-editing is a simple sharpening. This, you can do on virtually anything, even editing apps on your cellphone. So for this, I moved right on past that onto bigger and more advanced things!

Learning
First, I wanted to know how to better enhance the human eyeball. To me, this means make it stand out in an image, draw your own eye, to their focus point. This means creating that ‘glossy’ or almost ‘marbled’ look. Like this…
eye example
Found @ http://www.416studios.co.uk/journal/2012/eye-sharpening-photoshop-tutorial

To do this, I again, got some help from Youtube using Corel’s Discover Center channel. I found this to be bit more broad of a video, so it was simple for this feature & worked well.

What I did…
1. Open photo of choice, I chose my sister again with a close up shot of her eyes.
2. Choose the ‘selector’ tool, I used freehand.
3. I zoom up close, and highlight the eyes using the selector tool. *TIP: Do both eyes at the same time using the shift button! This means that both eyes will get the exact same effect and therefore will look the same in the end.
4. Once both eyes are selected, move to the Adjust panel >> Sharpness >> Unsharp Mask
*What is that? I wasn’t sure either, so I turned to google! The “unsharp” of the name         derives from the fact that the technique uses a blurred, or “unsharp“, negative image to create a mask of the original image.
5. From there, I played around with different strengths, luminescence, and radius’.
6. Select the choice you prefer, my strength was in the 400’s and apply!

Here’s my results…

IMG_8868.JPG

Before Sharpening

IMG_8868UNSHARPMASK

The ‘unsharp’ mask look. 


This worked great, and I LOVE the way it makes her eyes look. But, what is even cooler, is what I found while searching for videos…

How to change eye colour
The super simple video from Corel taught me just how to do this!
It’s pretty simple once you get the hang of it, and the video really gives directions well! To sum up…
1. Create a raster layer to work on, which is basically just on top of the original image
2. Choose a colour you’d like to use and colour the eyeball
3. Once complete, choose the saturation button, and then also adjust the strength of that layer
4. I cleaned up using the eraser tool and then added a sharpen on top!

Check this out! I think this is SO cool!

EYE CHANGING PROCESS 1

First Steps.. I chose blue

EYE CHANGING PROCESS 2

Changing the HUE

EYE CHANGING PROCESS 3

Changing the OPACITY from 100%>50%

IMG_8868BLUE EYES

Cleaned up edges & zoomed out!

IMG_8868BLUE EYES SHARPENED

Added a sharpen (learned from my first steps) and zoomed out! FINAL PRODUCT!

She looks good with blue eyes, don’t you agree?? I think this is SO cool!

Okay, I got the whole colour-changing down! It’s SO excting! BUT, then I found this video from a new channel while searching for others on Youtube and HAD to try it!

Check out my RAINBOW EYES!!!

It’s basically the same process, but with a few exceptions (saturation and blurring) If you want to learn how too, check out his awesome video!

RAINBOW PROCESS

using the paint tool to draw on selected colours

RAINBOW PROCESS2

changed the saturation and added a BLUR to the raster layer

RAINBOW EYES

TA-DA! Looks so weird, but was so fun to get to this process!

I am LOVING this section of editing & could work on it forever! I am wanting to try out a few more eye-editing techniques I found such as cat eyes! If you find anything you’d like done, or want me to try change your eye colours, send your pictures this way and I’ll give it a try! 

Next up, FINALLY my video about exactly how to ‘makeover’ a face! 🙂

Mental Health First Aid

This weekend I had the opportunity to take part in Mental Health First Aid 

20160229_115349_001.jpg

I am a big on professional development, and being a lifelong learner, so when the opportunity came up to educate myself on a topic that has been hitting very close to home, and big in education, I absolutely was going to take it!

So, what is it? 
Just like medical First Aid, you learn the basics on what a broken arm looks like, or a choking person, and then you learn the steps to helping assist that broken arm or choking person. Mental Health First Aid, is just that, in the sense that we were taught steps in recognizing mental health issues, and taking very simple, yet effective steps to assisting them.
We used the super effective ALGEE model to help us in each situation whether it be substance abuse, anxiety, depression, bipolar, or schizophrenic.

ALGEE

This model helped guide us through each situation as we learned about mental illnesses and what we can do as family members, friends, and teachers. We actually had so much fun learning and doing activities surrounding everything mental health.

Why I did it
As I’ve talked a lot about recently, mental health has become a HUGE area of interest to me as people very close to me are discovering problems with mental illness. I cannot imagine the things that my loved ones are going through and how scary it must be to face reality and deal with it. What is even scarier though, is the fact that I am their support system, and in two very different situations that i need to make sure that I’m educated in. The biggest thing for me, is being able to have the tools necessary to help my loved ones, coworkers, and future students, cope with the things that could happen to them.

If you are equipped with the First Aid knowledge to help someone with a broken arm, why are you not equipped with the First Aid knowledge to help someone who is having an anxiety attack? Mental Health First Aid is equally important to have- for everyone. 

This course challenged my thinking, made me laugh, cry, and think about how big of a deal this really is. We watched a video about a man getting hit by a car. People run up to him, see if he’s okay, and realize he’s not physically injured on the outside- they all walk away with the attitude ‘he just doesn’t want to go to work’. This video was so eye opening in the sense that we basically do this to people everyday, if they don’t look like they are hurting on the outside, we ignore the inside.

In the end, I have to say that I am proud. Proud of the fact that this is a course that is being offered everywhere, even in our small town. I am proud of the fact that I, as a new teacher was able to have the opportunity to engage in such a serious topic, and learn the tools that I will need to better the lives of so many people around me. And, I am proud of my loved ones, who are making such huge steps and progressing in ways that make me smile and want to hug them all at the same time.

After this weekend, I really do see things a bit differently as I educated myself about so many things surrounding mental illness and mental health importance. You should do the same thing, you will not regret it!

Check out the Canadian Mental Health First Aid website,website, and the hashtags on Twitter, or ask ME for any info you may need!

CHEESE! [editing pearly white teeth]

In addition to the other tools on Corel X6, I’ve also been playing around with the teeth whitening tool in the new program. I’ve used this in the past, however it is WAY more effective in Corel Paint X6! It turns out the new program is A LOT improved in terms of how the tool functions in just one click!

The way this tool works is similar to the first post I had about the blemish tool. It grabs colour from the surrounding area of the selector, and merges new colour together in that area. I found (in the old program) it to be great with teeth when they are straight on, but when shadows occurred, things started to get messy.

Here’s an example!
This is the OLD program, I wanted to go back to see the difference in comparison to the new one & man is there ever a difference. This photo below was a one click change. Note the colours it changed and left out!

ACTUAL OLD

The new program however did a much better job at choosing colours and changing the new colour to be all even…

OLD


I’d say that this is the most simple tool that I’ve used so far in this program and it’s something that will be used a lot. A road block that I did run into though, is over whitening. Since the picker tool selects the same tones to change to whiter, depending on the angle, it sometimes is similar to the colour of skin! Yikes! 

This is what happens….
*Note the colour of her face that turned to a shade of white to match the teeth. I really had to be careful.

IMG_8892IMG_8892 WHITE FACE

After that, I started to play around with the right shade of white, to find what looks normal. Here’s what too much white looks like!…

*original…
IMG_8892

*good amount of white…
IMG_8892 WHITE

*too much white…
IMG_8892 WHITEX3


In the end, it does take a bit of getting used to, but I’m happy with the way it operates. I know that I’ve had to whiten in the past (because of setting, background or personal preferences) but it hasn’t always been this easy.

*Coming up… full makeover tool!